|
Managment and nutrition
Birdroom Hygiene
Jim Hutton
Cleanliness
Cleanliness is the first essential of
good management. Clean, well-cared for budgerigars are most often healthy birds,
free from parasites and diseases that bring other, greater worries in their
path. Therefore, a good system of husbandry is of tremendous importance.
The aviary should be cleaned out at
least once a week, especially during the breeding season, to remove the copious
droppings left by the hens during the laying of the eggs. There is no need to
leave everything spotless, like a hospital, which in turn would disturb the
birds too much and affect the breeding results, but a general cleaning is a
priority.
Every day the aviary floor should be
swept before any other job is undertaken. This is important, especially during
the moult. A paint scraper, brush, bucket and shovel is all the equipment
necessary for the clean-up operation. Remember, dirt is the most common cause of
disease; it harbours deadly bacteria and I am sure many deaths in budgerigars
are attributable to a lack of cleanliness.
Hot
Water
About once a fortnight I usually mop the
floor with hot water and a strong disinfectant. The outside flights are raked
regularly, the flights having a covering of 10mm washed gravel approximately
12cm thick. This is usually kept clean by the rain washing any dirt from the
surface, the gravel acting like a filter. About twice a year a disinfectant can
be used, however, I would suggest you water well before allowing access to the
birds.
All appliances should be cleaned on a
regular basis. Every week, clean the water drinkers with a bottle brush and a
little Vanodine in warm water. The seed pots, grit pots etc., are washed on a
regular basis, again in a Vanodine solution. During the breeding season the
nest-boxes are cleaned between rounds only, when new wood shavings are added. At
the end of the breeding season, they should be thoroughly cleaned in hot water
and disinfectant, dried off and stored away, ready for the following season.
In addition to the weekly cleaning,
there should be a special clean-down at least once a year. If this is done both
after the breeding season and then in the autumn before commencing the breeding
again, then so much the better. In the Autumn it is best if all the breeding
cages are washed with warm water and disinfectant or Vanodine.
The walls in the birdroom can be washed
down, and it is advisable to give them a light spray of water and Duramitex,
leaving them to dry before any contact with the birds. Any maintenance and
painting can be done at this time. If you are contemplating making new cages, I
would strongly recommend using melamine-finish board, it will ensure that future
maintenance and cleaning will be much easier.
Outside
the Aviary
Autumn is a very good time for sprucing
up the outside of the aviary. Creosote all the timber, check all the wiring for
weakness or breaks and finally check all the roofing. Repair where necessary,
nothing is worse than a leak in the roofing during the breeding season.
Important Points
Two very important points in the control
of hygiene in the birdroom are:
- Ventilation:
Always ensure there is adequate ventilation in the form of windows that open,
wired doors, or extractor fans and air ducts. Plenty of fresh air helps to
keep down the threat of disease and dust accumulation.
- Adequate Space:
Make sure there is plenty of perching and flight space. A rough guide is
16cms of perch per bird. Overcrowding brings about stress, which in turn
brings about the chance of stress-related diseases.
Birds, like most animals, are subject to
internal and external problems. The symptoms - ruffled, puffed up appearance,
soiled vent etc., are familiar to most breeders. Sick birds should be isolated
immediately and kept warm and treated accordingly. This immediate separation
will help to stop the spread of any disease that may be present. If in doubt
about any signs of illness or treatment, always consult a vet.
Watch
your Numbers
The secret of good management and
hygiene is never to keep more birds than can be easily cared for, otherwise the
work involved becomes a disagreeable job, instead of an interesting hobby. Good
food and cleaning are the most important things for health and disease
prevention, without them you cannot expect to produce better budgerigars.
Original text Copyright © 1997, Jim
Hutton
Controlled feeding system provides
balanced diet
Champion Budgerigar breeder John
Bell looks at the
'Wisdom of the Yeast'
How often it happens that a chance
observation leads to the development of an important new product. Perhaps the
most  quoted
instance is Alexander Fleming's observation that "a mould colony had
anti-bacterial properties". That observation, followed by much hard work, gave
the world the antibiotics industry, and has saved millions of lives. quoted
instance is Alexander Fleming's observation that "a mould colony had
anti-bacterial properties". That observation, followed by much hard work, gave
the world the antibiotics industry, and has saved millions of lives.
What follows describes the development
of a feeding system for Budgerigars which also started from a chance
observation.
The Budgerigar was first introduced into
Britain by Gould in 1840. These birds were small, weighing about 35 grammes and
measuring only 6.5 inches in length.
With the founding of the Budgerigar
Society in 1925, by a group of far-sighted enthusiasts, came the stimulus to
develop the potential of this remarkable bird. Today, while the Budgerigar
Society Standard for an exhibition bird is some 8.5 inches in length, this
feature is not the only one which has changed. There are others - width of face,
thickness of shoulders and solidity of body, the whole frame coated with
feathers, whose form ranges from what is technically called "Yellow" through
Buff to double-Buff. The birds have lots of underdown, and directional feather
is now also a feature.
The fanciers continue to develop the
great genetic potential of the species, always seeking for that extra dimension,
which will guarantee success on the show bench. What this means, of course, is
that to-day's show bird is very different from Gould's originals. We must
recognise these changes and the metabolic requirements they may have created, if
we are to continue to develop the species.
We need now to look at the wider changes
which have been taking place as that little Light Green bird has been developing
into the show bird we know today.
The human population of the planet has
increased at an alarming rate. In any other species it would be described as a
plague, but since it concerns us, we try to ignore that fact. The result of this
explosive increase has been the need to produce more food. That increase in
output has often had to come from a reduced acreage of land. The increased
output has been achieved by the use of more intensive farming methods.
New varieties of cereals yield many
times the yield per acre of the older varieties; heavy use of artificial
fertilisers increase further the output from the fields and these coupled with
rapid re-use of the land for the next crop, all add to the pressure on nature.
Without doubt, the quantities of food
have been produced to meet the demand, but what of the quality? Can we be sure
that today's high yielding cereals and seed crops are supplying the same balance
of nutrients that was to be found in the older varieties under a gentler farming
system?
In part the question is academic,
because without the new varieties and higher yields we would not have fed the
human population to the extent we have. Many more people would have died of
starvation. The question remains however, "Is the total nutrient from seeds and
cereals as it used to be?"
The answer to such a question is doubly
important to a Budgerigar fancier, since it not only could concern his or her
own diet, but also could be of importance to the well-being of the birds.
For a possible answer to such a
question, we have to turn now to a company, Murphy & Son Ltd whose founder was
running a bureau of Biotechnology at the beginning of this century, long before
the word biotechnology became the buzzword that it is today.
The company has been closely associated
with the fermentation and food industries for some 102 years. It's laboratory
has monitored products and given technical advice over that time and has
developed skills in the management of yeasts and their fermentation behaviour.
Some years ago, in the course of their
routine work, it became evident that from time to time, fermentations were
slowing down, yeast vigour was being affected and yet it appeared that there was
an adequate supply of main nutrients.
Careful investigation revealed that
there were, at times, slightly lower levels of trace nutrients and minerals.
These were not large differences, but since very low amounts of certain trace
metals play a very important part in the living cell, the effects of adding
trace nutrients to the growth medium was tested. The results were in many cases
quite dramatic. Yeast was re-invigorated, fermentations returned to normal,
yeast cells multiplied rapidly and produced healthy new cells.
So Murphy & Son Ltd has a new product
which continues to serve the fermentation industry when it has problems. The
"Wisdom of the Yeast" might have remained there, if it had not been for a
Budgerigar enthusiast joining the company, namely the author of this page, John
Bell.
It was not a quantum leap in thought to
see that if yeasts, which depend for their nutrient on the products of cereal
grains, can suffer from deficiencies in their feeding, the same might be
happening to Budgerigars and other grain and seed-feeding birds.
The slow, painstaking investigation and
observational work which followed the initial thought will not be described
here, but the study has led to the development of a controlled system of feeding
which provides a balanced diet for the birds and is straightforward for the
fancier to operate.
It is most important to recognise that
Pro-System provides a balanced diet, and additional feeding of supplements is
both unnecessary and undesirable. The author is always willing to discuss
matters of feeding with fanciers who may have a favourite nutrient.
To give some ideas of the
straightforward nature of the diet, the main breeding trials were carried out
using the following menu:
|
Menu |
|
Category |
Amount |
|
Plain Canary seed |
50% |
|
White Millet |
25% |
|
Yellow Millet |
7.5% |
|
Panicum Millet |
7.5% |
|
Japanese Millet |
7.5% |
|
Niger |
2.5% |
|
Mineralised grit with oystershell |
Available at all times |
|
Pro-mineral Supplement |
Available at all times |
|
Vitamin Supplement |
Solution: 1 tablet to 1.5 litres
water (renewed daily)¹ |
¹N.B. This liquid
is used to supply the drinking water for the birds. A fresh solution is made up
of each day and drinkers are cleaned and replenished with fresh solution each
day, as a matter of good hygiene.
It is also important as a general
principle to ensure that all utensils and equipment such as nest-boxes are kept
in a high state of cleanliness. Where practicable, boiling for several minutes
in a suitable disinfectant solution is desirable.
Some observations made during the course
of the trials are particularly noteworthy.
- Levels of fertility and hatching rate
were excellent, this even applied to older hens whose age ranged from four to
seven years. Several very obese birds which had been acquired, were placed in
the main flight, where Pro-Mineral and Pro-Vitamins were available. The
majority of these birds slimmed down, became active fliers and returned to
breeding.
- The occurrence of adult birds failing
to feed their chicks was almost eliminated.
- Excessive swelling of breeding hens
was not encountered, even on leaving the nesting-box in the morning, hens
appeared to be comfortable and passed firm fæces.
- The fæces from the breeding hens
during egg-laying and incubation, were small, firm and free from objectionable
odours.
- All nest-boxes were completely dry
during egg-laying, sitting and rearing of chicks. This in itself is a very
important feature, since it does not encourage the multiplication of bacteria.
- Within minutes of introducing the
birds to the feeders containing Pro-mineral, they were sampling it with
obvious enjoyment. Earlier observations and calculations with regard to
consumption of cuttlefish, had created a puzzle, since the amount consumed was
far in excess of what should be required for egg-laying needs. After the
introduction of Pro-mineral it was clear that the birds had been consuming the
cuttlefish for the trace mineral requirements and, in doing so, had been
taking in an excess of the main minerals in the cuttlefish.
- As mentioned above, one feature of
this system is that it makes it possible for the birds to live on a diet
closer to that of their original desert habitat. The dry droppings are part of
their natural water conservation and are a sign of normality.
- A good additional supplement to give
to breeding birds is Whole Groats soaked in Cod-liver Oil and allowed to soak
prior to feeding, for 24 hours. Give 1 oz per pair per day only. Rate of
usage: to 1000 g Groats add 4000 I.Us Vit A (the ratio of vit A to vit D
should be 10:1)².
²N.B The above has been added in
order that those who use this may check the ratio of A to D on the particular
brand of Cod-liver Oil they use as this can vary widely.
A possibly interesting diagnostic
feature may arise from the state of the droppings, since during the extended
period of the trials, only two birds continued, for a period, to have wet
droppings. This was diagnosed as due to a small infection of Trichomonas, though
it had not reached the point of causing "reaching" which is normally associated
with this problem. It may be that having established dry droppings as the
normal, a deviation can be taken as a warning to examine the bird closely.
Good
routine
As a matter of good practice, it is
recommended that Dr John Baker's finding on
Trichomonas and his treatment using
Emtryl be adhered to and the whole flock treated once per year as a matter of
good routine.
Breeders who have already used the
Pro-System for a complete breeding season, have reported that fanciers visiting
their aviaries, comment on the increased level of noise and activity. A sure
sign of well-being.
Having seen the marked improvement in
the Budgerigars, we are left with wondering how far we humans are suffering from
trace nutrient deficiencies.
Editor's note: Dr John Baker, who has
done some research into this question, says that modern intensive agriculture
may have reduced the amount of micronutrients in seeds and this may occasionally
happen with certain types of excessive fertiliser use, but it is equally likely
to arise when crops are grown on naturally deficent soils. In addition a seed
diet alone is insufficient for peak performance as seeds are naturally low in
some micronutrients regardless of the type of soil and fertiliser use, so that
some form of supplementation is required.
Original text Copyright © 1995, John
Bell.
Housing and Birdroom Management
Jeff Attwood
The manner in which an aviary or
Birdroom is designed can add or detract from one's enjoyment of the hobby.
Until established in the hobby and sure
that this is the interest you intend to follow, great expense and unnecessary
outlay can be avoided by making use of the existing available space. A garden
shed, unused room in the house or even a sectioned off rear of a garage can all
be utilised and arranged to successfully house and breed exhibition Budgerigars
during the formative years. My first outside flight was a disused wardrobe with
the front removed and replaced with wire netting and laid on its side. The
sleeping quarters was a "tea chest" fitted with legs and attached to the side of
the wardrobe. During the early- and middle-1950s this served me well together
with a few breeding cages in my parent's garden shed.
No
Thought Given to Design
Gradually this was extended to a number
of units which like "topsy" grew and grew with no real thought to design and
became a bit of a shanty town. All this however cost very little, and during
that period I began to form the idea of what type of establishment would really
suit the requirements of the birds and become an enjoyable feature of the
garden. This I was able to achieve when moving to my present home in 1977. I
prepared a master plan based on my own and other fanciers' experiences and
gradually developed the aviary I have today.
Avoid
Problems
First and foremost there are certain
preliminary steps to be taken which can avoid unnecessary confrontations with
neighbours and local authorities. Don't forget that the erection of a large
birdroom in the back garden can often irritate a neighbour both the aspect of
noise and appearance. The legal position can often favour the complainant when
neighbours fall out.
Firstly with regard to planning and the
District Council. Recent legislation has made allowance for certain structures
under what is referred to as "exempt regulation". No planning approval is
required in certain circumstances. These apply to structures such as
greenhouses, carports, garden sheds, some sun lounges and aviaries, as long as
certain criteria are complied with. The structure in question must not exceed
50% of the garden space available. It must be at least one metre from the
boundary with your neighbours and must not exceed 4 metres in height with an
apex roof. The maximum space permitted without approval is 40 square metres as
long as this does not exceed the 50% of garden space mentioned above.
You must be cautious however, as
previous additional development to your property affect the amount of space
permitted for your aviary. Also the Local Authority's interpretation of the term
"aviary" differs from area to area and in all cases applies only to the
hobbyist. A very large aviary using up the maximum space may be regarded by some
authorities as a business, and planning approval would then be required. Don't
forget that although legally an aviary may be permitted the question of noise
pollution is a separate issue and can still bring problems.
Seek
Advice First
With regard to planning approval I would
recommend going along to your local council taking with you a simple plan of
your garden. This should show house and the other houses in the immediate
vicinity. It should include boundary fences and walls and other structures such
as greenhouses or sheds already in your garden. Once verbal agreement has been
reached send them a courteous letter together with a copy of the agreed plan and
request that they confirm in writing that they have no objection. The reply, if
favourable, should be kept somewhere safe for future reference should the need
arise. Next call on adjoining neighbours and seek their approval of what you are
planning. Offset any doubt they may have regarding noise or spoilt views and you
will be off to a good start.
When deciding on the construction, many
factors must be determined, and in the majority of cases cost will be the main
factor. I personally favour a brick or block structure as I consider the
atmosphere within, both for temperature and humidity, is more stable than with a
timber construction. Nevertheless, in my case I eventually decided on timber.
You can plan your own shed to vour personal requirements and most timber
merchants will build what you require at little extra cost. Take advice on the
thickness of the timber as a long exposed shed wall, if insufficiently
supported, can be subjected to excessive wind pressure and collapse.
Ventilation Prevents Disease
My own birdrooms are ten feet high at
the roof apex. to allow plenty of air circulation, with all natural light and
louvre-type ventilators at a high level above the cages. This I feel gives
plenty of ventilation which reduces incidences of dead in shell and also allows
the use of all wall areas, with the exception of the door space. All walls and
ceilings are insulated with Cosywrap before cladding with "laconite", a
spray-painted surface board. This allows me to keep the temperature at a
reasonable level with just a one kilowatt fan heater, thermostatically
controlled, throughout the colder winter months, when the birds are breeding.
The wall surfaces can be easily washed down.
Flight areas, both inside and out, are
in my opinion, essential to maintain fit active Budgerigars throughout their
lives, from barhead to adult. Flights prevent the build up of excess body fat,
particularly in hens. In providing flying areas certain rules should be adhered
to.
- Make sure that the inside flight
(sleeping area) has at least two perch spaces available for each bird to
permit movement.
- Ensure that both inside and outside
flights have sufficient space to accommodate the number of birds you can
expect to produce. Overcrowding can easily lead to outbreaks of disease.
- Have an opening between the inside
and outside flights, sufficiently big to allow large numbers of birds to fly
together, tiny bobholes lead to broken necks!
- Vary the perch size and level to
ensure adequate exercise for feet and wings.
Cages vary in size and design but I
consider that stock cages of good size are essential for housing barheads on
weaning, for show preparation and for sale birds.
Wire
Cages Stimulate Birds
With regard to breeding purposes, some
seventeen years ago, after discussion with Dob Travinecek of the USA, I started
to use the all-wire cage. Based on the theory I stated earlier, this was to suit
the bird rather than to look as attractive as a matching block of conventional
cages. The Budgerigar is a gregarious, flock bird, preferring the company of
many of its own kind. It is stimulated by the sight and sound of other
Budgerigars. The wire cages simulate a controlled colony type breeding
environment. I have found it to be beneficial to my breeding success
particularly with difficult birds. A similar effect can be achieved by using
wire or glass separating slides in conventional cages.
Heating of the breeding space during the
winter months is, I consider, highly desirable. A minimum temperature of
50° Fahrenheit should be aimed at although a temperature of 60° Fahrenheit is
really enjoyed by the Budgerigar. Heating, together with adequate and suitable
lighting is most advantageous in achieving consistent early breeding results.
Probably one of the most essential pieces of equipment is the night light. This
permits a low level of lighting throughout the birdroom during the hours of
darkness. There is no doubt that this can reduce the incidence of addled eggs
and infant mortality in the event of night fright by allowing hens to find their
way back to the nestbox following a disturbance.
Hens
Will Nest Anywhere
Nesting boxes are also found in many
different sizes and designs. No matter what the human eye perceives as suitable,
hen Budgerigars will seek out any dark corner or enclosed space to lay their
eggs. For purely reasons of convenience, I adopted the plastic nest box some
years ago, and use these in all my wire cages. They are long-lasting, easy to
clean, do not harbour mites, and in the event of a joint breaking are very easy
to repair with a hard plastic adhesive. I still use a wooden concave and a
handful of sawdust with these nest boxes.
American
Innovation Pays Dividends
One recent addition to my outside
flights, which I discovered in the United States, is a water misting system.
This sprays a very fine rain over the birds which is most welcome during hot
spells and can be used to improve feather condition during the weeks leading to
the open shows. It is also most effective in bringing birds into wonderful
breeding condition when used after the Autumn moult. I feel it simulates the
natural rain which occurs in the Australian Spring thereby triggering the birds'
own reaction.
This subject of management has many
different facets all of which I cannot touch but there are the basic points.
Original text: Copyright © 1995 Jeff
Attwood
Dr John R Baker
Introducing New Birds into a
Budgerigar Stud
Work at the University of
Liverpool over the last 10 years has shown that when an infectious disease
breaks out in a budgerigar stud, this is nearly always associated with the
introduction of a new bird or birds. The purpose of this article is to suggest
ways of greatly reducing this risk.
The number of infectious
diseases that can strike a budgerigar stud is large, and with more work being
done on cage-bird illness, both in this country and abroad, new ones are being
found every year. Diseases which do not currently occur in this country may be
introduced from overseas. Some of these diseases are relatively mild and some
are easily cured, but there are a large number which can be very serious, with
the death of a large number of birds, and there may be nothing which can be done
to improve the situation.
Far and away the commonest
reason for an outbreak of infectious disease in a budgerigar stud, is the
introduction of a new bird or birds. These birds can be apparently healthy on
the premises from which they come, but they can carry disease-causing germs
without showing symptoms. This can happen in two ways; either the bird has the
germs hidden in small numbers where they can not cause problems, or the bird may
be immune to the disease, but still infected. When this bird is stressed, by
moving it to a new aviary for example, it can go down with the disease, and in
this state it will be excreting vast numbers of the germs to infect the new
premises. Even if it does not become ill it can cause a disease outbreak if the
birds in the new stud have not met the infection before, and thus have no
immunity to it.
The habit that many fanciers
have of putting new birds into the flight with the others, or putting them down
to breed in the bird room is potentially disastrous. With many other classes of
stock this would be considered extremely fool-hardy and not to be considered. At
the University we have investigated large numbers of outbreaks of disease in
budgerigars, some of which have been so severe that the stud has been nearly
wiped out. Fanciers have left the hobby because they could not face the problems
associated with dealing with the disease.
The way to avoid nearly all such
outbreaks of disease is to quarantine the new birds, regardless of their source.
Quarantine should not be done in the bird room, as many diseases can spread
without bird-to-bird contact. For example, some diseases can be spread in the
dust that the birds produce. Quarantine should, therefore, be done somewhere
else, in a garden shed or the spare bedroom for example. The new birds should be
kept in isolation for 3 to 4 weeks. Ideally they should not be
looked after by the fancier who is dealing with the main stud, but if this has
to be the case, the new birds should be seen to after the rest of the stock, so
that disease is less likely to be taken into the bird room. It would also be a
good idea if the fancier had some overalls or an old coat which can be used in
the quarantine area. After dealing with the new birds, the fancier should wash
his hands thoroughly and also use a skin disinfectant; cages and other equipment
should be cleaned and disinfected before being put back in the bird room after
the quarantine period.
When the birds are in quarantine
they may go down with the disease they were carrying, and thus the risk of
disease in the main bird room will have been greatly reduced. This is not the
only advantage of quarantine. The birds may be dosed to get rid of infections
they may have - treatment for worms, scaly-face and Trichomonas come to mind as
examples. The birds can also be tested to see if they have bacterial infections,
megabacteria, worms, psittacosis, budgerigar fledgling disease and psittacine
beak and feather disease are all easily tested for these days, although it is
moderately expensive. But what is the cost in terms of time, expense and worry
if one or more of these diseases are introduced? I would suggest that the latter
is far greater, and part or all of the stud may be wiped out adding further to
the cost of the disease.
In the USA it is becoming
routine with the larger members of the parrot family, not only to screen for
such diseases as the ones mentioned above, but also to test the new birds for
general health by doing such things as blood tests and droppings examinations. I
am not suggesting that these should be carried out if birds are frequently
introduced into a stud, but if the stud is almost entirely closed and new birds
are brought in only very rarely, it would be worth considering them.
In summary, strict quarantine of
new birds would eliminate many of the problems that budgerigar breeders face and
the birds in many studs would be far healthier.
Original text Copyright © 1994,
Dr John R Baker.
Natural Conditioning - an
alternative method
Keith Flockhart
Aloe
Vera
I am not sure if there is any scientific
evidence to back up this article but people who have used it seem pleased with
their results, and there is Aloe Vera available in New Zealand for farmers to
give to their dairy cattle. Most health shops sell capsules, hand cream etc., so
there must be something going for it.
I have had two people contact me on the
use of AloeVvera as a natural wormer and also a tonic and pick me up. The first
person places a whole AloeVera leaf in his drinking water for four to five days
every two months and says there is no algae forming while it is in the water.
The other is from Les Gill and he uses Aloe Vera on his birds.
Keep your birds in top condition by
growing and using Aloe Vera in your aviary's day to day management. Aloe Vera is
a miracle cure for most diseases in birds.
- It helps with digestive disorders
caused by birds eating infected foods.
- It is a wormer and laxative.
- It is excellent on cuts and sores and
will stop cuts bleeding and act as an antiseptic.
- It can be used as a spray and acts as
a conditioner.
- It stops bacterial and fungal growth.
- It gives your birds greater stamina.
- It helps prevent egg binding.
- It will help control a lot of other
diseases.
The active ingredients in AloeVera
are:
- Alion, Baralon, Natalon, Chlorophyl,
Emodin, Resins, Albumin, Essential oils, Gum Arabic, Silica, Phosphate, Lime,
Iron.
The minerals it contains are
- Vit. A, Vit B1, Vit B2, Vit B3, Vit
C, Vit E, Vit B12,
The minerals it contains are
- Calcium, Chloride, Chromium, Copper,
Magnesium, Potassium, Sodium, and zinc
There are also 17 amino acids and 5
enzymes.
The enzymes are most beneficial to the
birds whole system and will activate the functioning of any sluggish parts. This
means an improvement in health and well-being, and a noticeable difference can
be observed after 48 hours.
To use Aloe Vera make a gel juice by the
following method.
- Fill a one litre jar with rain or
filtered water, and place a 115 gram piece of Aloe Vera leaf in it. If using
as a wormer of laxative leave the thick skin on, otherwise trim it off.
(Remember, put water in jar first)
- Place jar in refrigerator for 24
hours. The leaf will float at first and when ready will sink to the bottom of
the jar.
- Dilute the solution 50/50 with water
and give to your birds daily.
- The original solution can also be
topped up and the Aloe Vera leaf will be effective for 14 days..
Remember you cannot overdose your birds
on this.
Important points
- Do not shake or stir the jar as the
enzymes are very sensitive.
- Keep refrigerated, enzymes are
destroyed by heat.
- Change water daily.
- Solution can also be sprayed on birds
for external parasites.
- For cuts and sores use the gel that
oozes from the leaves.
Original text Copyright © 1999, Keith
Flockhart
Practical Management
Nigel Tonkin
 The
initial part of the discussion will cover questions that are asked on the
handling of budgerigars during sickness and from there it will be basically an
open forum with back up questions and answers enclosed if required. The
initial part of the discussion will cover questions that are asked on the
handling of budgerigars during sickness and from there it will be basically an
open forum with back up questions and answers enclosed if required.
I have a bird that is off-colour
and needs medication or food administered directly into the crop, how do I do
this?
To respond to this question I showed a
video on crop needling. I then demonstrated the process first and then observed
whilst others partook.
 Remember
that the budgerigar is held in your left hand, facing you. Slowly insert the
crop needle and rotate downward aiming for your left thumb. You should feel the
ball of the crop needle against your thumb. Remember
that the budgerigar is held in your left hand, facing you. Slowly insert the
crop needle and rotate downward aiming for your left thumb. You should feel the
ball of the crop needle against your thumb.
I, in the main, use an 8 gauge crop
needle and with great success with budgerigars from 3-4 weeks of age onwards,
particularly if I am feeding a hand-rearing food. An 18 gauge crop needle for
medicating large chicks to adults and 22 gauge for medicating 3-4 day old
through to 2-3 week old chicks.
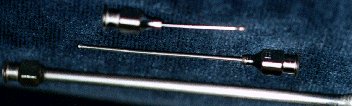 The
three gauges of crop needles that I use: 8, 16 and 28 gauge crop needles The
three gauges of crop needles that I use: 8, 16 and 28 gauge crop needles
If I am asked to inject my
budgerigar by the vetinerary surgeon, how do I go about it?
I will firstly demonstrate the method
that I use. Always feel for the keel bone and then inject into the muscle. Each
time the bird is injected, alternate from left to right of the keel bone, to
help the reduction of bruising.
On removal of the needle, I usually
massage the injected area. It is important that prior to injecting the bird,
that you 'bleed, the needle of air by flicking your finger onto the syringe
(needle facing up) and pushing the "plunger" until air bubbles are no longer
present, and only liquid is emerging from the needle.
 Do
you have any suggestions for identification of specific diseases of the
budgerigar/ Do
you have any suggestions for identification of specific diseases of the
budgerigar/
In a word, "No." It is imperative that a
proper diagnosis is made of any perceived problem by your Veterinarian, prior to
treatment with any drug. Some fanciers will "treat" their sick bird with a
cocktail of drugs in a hit and miss treatment that may well kill the bird, or
camouflage the actual problem, thus making diagnosis for the Veterinarian
difficult. Some of these "cocktails" have proven useless, as they destroy the
benefit of each other. The best policy, as stated before, is to seek the Vets
advice.
What procedure should you follow
when introducing new birds into your establishment?
All introduced budgerigars should be
quarantined for approximately 6 weeks. By quarantined, I mean totally isolated
from your aviaries, thus reducing the risk of spreading disease if, per chance,
there was a problem present. During this quarantine period, faeces and crop
samples should be taken by your Veterinary surgeon or, if you are able, collect
the samples yourself and deliver to the Vet for testing for worms, coccidiosis,
psittacosis etc. My preference, particularly with imported birds, is to have the
Veterinarian bring his microscope and necessary equipment to my establishment,
to enable on the spot testings for canker and megabacteria plus "set" the slides
with faeces and crop samples for further examination and testings back at the
clinic. A spread sheet is produced identifying all of the birds to be tested,
with results added as they come to hand. The beauty of this system is that
individual "problem" birds can be isolated into holding cages for specific
treatments. It would be a good idea at this stage, if all is clear, to treat the
birds with an appropriate probiotic to colonise the gut and exclude harmful
bacteria.
Approximately 2 weeks after the arrival
of the new birds, introduce to the quarantine facility (again only if all tests
are clear), either a "control" bird, or droppings from your own aviary-kept
birds (it would probably be a smart idea to have had some tests done on these
budgerigars at the same time as the birds that are in quarantine, to ensure all
is well). This helps to introduce "good" bacteria from the aviary-kept birds, to
the quarantined birds, without a major risk. It is best to establish that the
"good" bacteria is compatible prior to releasing the new birds into the
established flock.
An appropriate time to introduce
purchased birds is during the breeding season if possible, the birds can be
paired instantly (if breeding fit), and the period during breeding acts as the
quarantine period. The idea of isolation in wire breeding cabinets will be
questioned. I prevent contact via clear perspex dividers The birds still require
farces and crop tests.
The use of "control" birds in all
aviaries can be of benefit. By "control" bird, I mean a fit bird of inferior
quality, flying with your required birds (2-3 per flight), for the purpose of
availability for blood sampling or autopsy if a problem arises within that
flight.
Is it worth repairing damaged
eggs?
Yes.
Okay then, how do you go about
repairing damaged eggs? 
Many an egg has been saved and many more
could have been saved, if time was taken to assess the severity of the damage.
If the egg has just been laid through to early embryo stage, examination can be
made with a "laser" torch to assess if the white is full of air bubbles, if this
is the case, the damage is too severe. If the embryo is visible, and blood
appears to have "collected" on the one side within the egg, this damage is
possibly too severe but worth attempting to salvage. Almost any other damaged
eggs should be repaired, within reason. I have Selleys Aquadhere PVA
non-staining, non-toxic wood working glue on hand along with dry shells from
hatched eggs or from clear eggs that have been opened and left to dry for the
repairing process.
Do not use too much glue, just a thin
film, as drying time is extended. Carefully select and shape the patch for the
repair. Wait for the glue to totally dry prior to returning to the nest box. I
usually keep the repaired egg between my lips whilst I go about the other aviary
duties. I then place the patched area of the egg on some fine sawdust to see if
the sawdust attaches to the egg, if so, I wait a little longer, retest in the
sawdust and return to the appropriate nest box. The biggest mistake you can make
is returning the egg with wet glue and later finding the egg attached to the hen
as she leaves the nest box.
What do you feed your birds and
does this continue unchanged throughout the year?
- It is essential to feed a variety of
good quality "dry" seed all year round.
- A daily supply of soaked or sprouted
seed, this must be drastically reduced during the warmer weather.
- A daily supply of greens eg., silver
beet.
- A weekly, or fortnightly supply of
gum leaves and branches.
- A continual supply of grits both hard
and soft.
- A daily water supplement eg.,
Calcivet daily and Soluvet 3 times per week (note you can mix the Calcivet and
Soluvet together) leading up to and including the breeding season - after the
breeding season is completed, stop the Calcivet usage and reduce the Soluvet
to 1 to 2 times per week.
I periodically review my feeding
programme. I have stated in the past that when one sights a "positive" practice
in someone else's aviary, and that practice suits your purpose, initiate it. My
seed in the main is grown for me in Queensland, and is fed in large, separate
containers by variety. By using larger containers, the birds have maximum
feeding space, thus reducing stress. The following are fed dry:
- Plain Canary
- Jap Millet
- White French Millet
- Red Panicum
- Grey Striped Sunflower
- Bandicoot Oats
- Wild Seed Mix
My soaked seed mixture is made up of:
- 10 parts Triticale
- 10 parts Bandicoot Oats
- 1 part of "small" mixed seed to which
Aviclens is added. This mix is soaked for 12 hours in water, rinsed, drained
and fed twice daily. The Aviclens slows down the fermentation process during
soaking thus reducing the risk of bacterial contamination of the seed.
I feed the birds silver beet daily,
unless of course they are being administered a "treatment" via the water. If
this is the case, all soaked seeds and silver beet feeding ceases until the
"treatment" is completed. On completion of the "treatment", the silver beet and
soaked seeds are reintroduced gradually (ie., in smaller amounts). Gum leaves
and branches are also withdrawn during any "treatment" as the birds are likely
to extract needed moisture from this source rather than the drinking container.
Just on "treatment", I withdraw the drinking containers from the aviaries and
breeding cages (if no chicks are present), at about 2pm and reintroduce at about
10am the following day, thus encouraging all of the birds to get a share of the
"treatment". After any given "treatment" or a show, I give the birds a 1 to
3 day probiotic course. I prefer open drinking vessels in the aviaries that are
made of pottery, glass or enamel. I detest the bottle with the "drip" system as
I do not believe that the birds get a fair go at drinking in an aviary
situation. The birds like to eat together and drink together as in the wild. I
also believe that the risk of disease from this system is greater as any problem
bird leaves a "concentrated form" of the problem at the small outlet.
Hard grit ex Broken Hill, shell grit,
Mount Gambier limestone, dolomite and cuttle fish obtained locally, are made
available at all times, and beach sand is spread under the aviary perches.
The moult and breeding season sees minor
changes to this programme - if I get a feel that the birds need a little
something extra, they get it supplied. Millet sprays being one of these little
extras, in fact the nursery cage is swamped with these sprays, as it seems a
preferred source of intake for the "weaned" birds.
The diet of the budgerigar will vary
from aviary to aviary - it is the breeder of these birds that has the final say
on what is presented to the birds, and not the birds themselves, so surely, we
owe it to them to give the best that is available to encourage a long and
fertile life. What do you think?
Would you breed with birds that
have been affected by, and remain a visual French Moulter? If so, would the
progeny or later descendents be afflicted? What do you believe causes French
Moult?
To the first of the 3 questions my
answer is "Yes", if it is a quality bird. Jeff Attwood visited my establishment
on his last visit to Australia, and saw a Grey Green Cock of exceptional
quality. He suggested I lower the perches in the breeding cage to 12mm from the
floor. I had good results with this. In the first year the first round chicks
were perfect FM-wise as were the first round chicks of the following year, but
in the second round of both years, I had 2 FM chicks in each nest. It should be
noted that in the first year, another pair had a FM chick and the second year a
number of pairings did, so I could not confirm anything from this.
I have thrown many theories around about
French Moult prior to the evidence that French Moult is caused by a virus,
without ever coming up with anything concrete. The feather problems always
seemed to appear in the latter part of the breeding season, in my case Summer
(December). Up until a few years ago, I always managed to produce 2 or 3 French
Moulters. Last year there were 5 or 6 FM and around 7 tail-less wonders The year
prior, there were 35 FM and 2 or 3 tail-less wonders. There have also been the
odd few that have an appearance that the tail, and in some cases, some of the
body feathers, have a quill within a quill, similar I guess to a "break" in
wool, once a sheep has been under some kind of set back.
My initial theory was, that as it was
the end of season, the birds may be losing some of their breeding fitness, plus
I may not be giving them the full attention that they deserve, in that I should
perhaps be increasing the protein content in that last month of breeding.
The next theory was, that a mite could
be the cause, but because it was occurring in random nests and with random
birds, this theory was again questioned.
Now that scientists have discovered a
virus and also are, I believe, in the advanced stages of finalizing a vaccine
for the virus, it has opened up the possibility of "controlling" one of the
dilemmas of the fancier. Even after the knowledge of the latter, I question the
random choosing of the birds that do become French Moulters. Thus, I believe all
three suggestions might have some bearing on the problem. If the diet of the
parent birds is not adequate, it could be fair to say that some of the
youngsters might not be "totally" fed, thus becoming vulnerable to a virus, or
even other forms of infection. Therefore, within any given nest there could be
birds that are more vulnerable than others, thus perhaps, explaining why not all
of the birds within the nest are affected.
This virus may be air-borne, but may
also be carried by a mite. There always seems to be evidence of mite when French
Moult is found - this might not be the case in all aviaries but certainly the
aviaries that I have visited in this country that have had French Moult, have
also in the main, had evidence of mite. The presence of the mite, and the mites
activity of sucking blood from their hosts, may break down the birds resistance
again making the bird vulnerable to the virus, or perhaps the mite may be the
transfer agent?
Regards the "short tail syndrome", there
have been claims of success by feeding those affected birds with vitamin "K", a
blood clotting agent, via the crop? I am yet to trial this, but I will, and it
will be via the crop and by injection, and on birds that have been this way
for 10 -24 months. I have been given a word of warning by a chemist that, if too
much Vitamin "K" is administered, it may cause a heart attack - tread carefully.
Do you number eggs as they are
laid? Do you clean out the nest boxes between rounds? At what stage do you
remove the youngsters from the nest box?
Yes, I number all of the eggs plus write
the cage number upon them as well, ie., Egg 1 Cage 2 = 1:C2. I then write the
date the egg was laid and the nest it was transferred to upon the nest box info
sheet. I aim to spread the eggs throughout the breeding cages as an insurance
against losing a complete nest of eggs, if per chance, the hen dies on the nest,
or her eggs are damaged etc. I aim to clean the nest boxes out between rounds
and insert a new lot of sawdust. This can be a bit risky if a hen has already
started to lay as she, or even the cock may attempt to clean the sawdust out,
thus risking the breaking of the eggs. I prefer to remove youngsters at about
3 1/2 weeks of age and place them in a "protective" area on the floor of the
cage, (a cover with a concave base, openings in the front and one side). The
concave is filled with seed at morning and night and millet sprays are added to
encourage the chicks to eat, the cock still continues to top them up and the hen
can get back to laying round 2. Chicks are then totally weaned at 4-5 weeks.
What advice would you give to
someone just commencing in the fancy and aiming to purchase birds?
I usually advise first-year beginners to
forget about expensive birds until they have learnt a bit about breeding
practices. In fact, I have suggested to some new fanciers that aimed to purchase
birds from me, to come back after 12 months and see if they still want spend
their money. A few do, and have continued with the hobby. Others are thankful of
that advice, as they did not continue on. Once the new fancier does start to get
an eye for a bird, regardless from whom they purchase from, they should aim to
buy 1 cock and 2 hens or 2 even pairs that are hopefully, related and from a
good background.
Editor's note.This
article has been abstracted from Nigel Tonkin's notes, formulated for a lecture
given at the 22nd Annual Golden Cob Australian Championship Budgerigar Show
in 1996, hosted by the Queensland North & Central Zone Budgerigar Council.
Original text Copyright © 1996 Nigel
Tonkin
Year-Round Feeding
Nigel Tonkin
It
is essential to feed the following all the year round.
- Good quality dry seed.
- A daily supply of soaked or sprouted
seed.
- A daily supply of greens, which must
be drastically reduced during the warmer weather or:
- A fortnightly supply of gum leaves
and branches.
- A continual supply of grits; both
hard and soft.
- A daily water supplement, such as
Calcivet daily and Solavet three times per week (note: you can mix the
Calcivet and Soluvet together) leading up to and including the breeding
season. After the breeding season is completed, I stop the Calcivet usage and
reduce the Soluvet to 1 to 2 times per week.
I periodically review my feeding
programme. I have stated in the past that when one sights a positive practice in
someone else's aviary and that practice suits your purpose, initiate it. My seed
in the main, is grown for me in Queensland and is fed in large, separate
containers by variety. By using larger containers, the birds have maximum
feeding space, thus reducing stress. The following are fed dry:
- Plain Canary
- Japanese Millet
- White French Millet
- Red Panicum
- Grey Striped Sunflower
- Bandicoot Oats
- A Wild Seed Mix
My soaked seed mixture is made up of:
- 10 parts Triticale
- 10 parts Bandicoot Oats
- 1 part of small mixed seed to
which Aviclens is added.
This mix is soaked for 12 hours in
water, rinsed, drained and fed twice daily. The Aviclens slows down the
fermentation process during soaking thus reducing the risk of bacterial
contamination of the seed.
Green
Food
I feed the birds silver beet daily
unless they are being administered a "treatment" via the water. If this is the
case, all soaked seeds and silver beet feeding ceases until the care is
completed. On completion of the medication, the silver beet and soaked seeds are
reintroduced gradually in smaller amounts. Gum leaves and branches are also
withdrawn during any treatment, as the birds are likely to extract needed
moisture from this source rather than the drinking container. During periods of
medication, I withdraw the drinking containers from the aviaries and breeding
cages (if no chicks are present) at about 2pm and reintroduce at about 10am the
following day, thus encouraging all of the birds to get a share of the
doctoring.
After any given care or a show, I give
the birds a 1 to 3 day probiotic course. I prefer open drinking vessels in the
aviaries that are made of pottery, glass or enamel. I detest the bottle with the
drip system as I do not believe that the birds get a fair go at drinking in an
aviary situation, the birds like to eat together and drink together as in the
wild. I also believe that the risk of disease from this system is greater as any
problem bird leaves a "concentrated form" of the problem at the small outlet.
Hard shell grit, limestone, dolomite and
cuttle fish obtained locally are made available at all times and beach sand is
spread under the aviary perches.
Minor
changes
The moult and breeding season sees minor
changes to this programme. If I feel that the birds need a little something
extra, they get it supplied. Millet sprays being one of these little extras, in
fact the nursery cage is swamped with these sprays, as it seems a preferred
source of intake for the "weaned" birds.
The diet of the budgerigar will vary
from aviary to aviary and it is the breeder who has final say on what is
presented to the birds, and not the birds themselves, so surely, we owe it to
them to give the best that is available to encourage a long and fertile life.
What do you think?
Original text Copyright © 1997 Nigel
Tonkin

| 