Line Breeding with Dominant Pieds
Hector Segui and Norman Schofield
 The
SAS1 partnership started in Dominant Pieds with a pied line in which some of the
cocks produced had spots missing, but with hens that were nearly always fully
spotted The
SAS1 partnership started in Dominant Pieds with a pied line in which some of the
cocks produced had spots missing, but with hens that were nearly always fully
spotted
There are some Pieds on which the only
visual sign of their variety is the patch on the back of the head. These birds
when paired, can still produce a well-marked pied so do not necessarily discard
them
When one is building a stud, line
breeding is important. We always try to follow one of the following options:
- Year 1: Pair best Dominant Pied cock
to the best suitable normal hen in the stud.
- Year 2: Pair best hen from above
pairing back to the sire.
- Year 3: Pair third generation hens
back to original sire.
By doing this the youngsters produced
will have an increasing dose of the original sire.
- Year 1: Pair best Dominant Pied cock
to two good quality normal hens.
- Year 2: Pair half-brothers and
sisters from the two pairings together.
- Year 3: Pair third generation hens
back to original sire.
This again produces youngsters with an
increasing dose of the original sire. We have experienced some very good results
using this method We also try to breed each of our best cocks with two hens in
each season. This again produces half brothers and sisters, doubling up on the
original bloodline.
We cannot say that outcrossing does not
produce good birds, this does happen now and again, but further pairings with
outcrosses have not improved on this form of pairing and can prevent improvement
in your stud.
During the years we have been
specialising in breeding Dominant Pieds we have experienced highs and lows and
from these experiences we have reached the following conclusions.
Lack of
Spots
To avoid this fault, we are very
selective in our pairings, and although it is tempting to breed from a fair
sized pied, if such a bird comes out of a line with an inherent fault of
permanent spots missing or no spots at all, it is not advisable to use such a
bird in establishing a Dominant Pied line, as the fault will manifest itself
throughout your Pied stud.
Being of a dominant inheritance, it is
quite easy to breed the Dominant Pieds by simply pairing one to a non-pied mate.
It is always best to pair Dominant Pieds to first class normals so as to improve
the general quality of the birds and maintain the colouring (if opalines are
used markings sometimes suffer). When two Dominant Pieds are paired together
there is always a strong tendency for the birds produced to have only very small
dark areas which is not desirable and we have experienced instances where these
matings in later generations produce Dominant Pieds that showed the Recessive
Pied colour pattern, i.e., broken cheek patches and incomplete sets of spots
together with colour failings. It is therefore, essential in producing good-coloured
Dominant Pieds to use Normal × Dominant Pied matings.
By keeping records of our pairings and
the breeding results, we have also come to the conclusion that when pairing a
non-pied hen which has been bred from a pied nest to a pied cock, we produce 75%
of Pieds instead of the 50% expectation.
If you persist in your efforts to breed
a good-sized, well-spotted and well-marked Pied as per the Budgerigar Society
Colour Standards, 1994 you will find that your hard work is much appreciated
by other fanciers.
Below is given the BS Standard for the
Dominant Pied Light Green.
Mask
Buttercup
yellow, ornamented by up to six evenly spaced large round black throat spots,
the two outer spots to be partially covered by the cheek patches. The buttercup
yellow of the mask extending over the frontal and crown, to merge with the black
undulations at the back of the head. The frontal and crown should be clear and
free from all markings.
Cheek Patches
Violet
General Body Colour
Rump,
breast, flanks and underparts; bright grass green of a solid and and even shade
throughout but broken with no more than a maximum of 50% of total body colour
area by irregular patches of buttercup yellow or with a clear buttercup yellow
band around its middle, just above the thighs.
Markings on cheeks, back of head,
neck and wings
Black with a
well-defined yellow edge but having irregular patches of clear buttercup yellow
or with part of the leading edge of the wing up to the shoulder clear buttercup
yellow on an otherwise normally marked wing. Wing markings may be grizzled in
appearance, all markings should be free from any intrusion of body colour.
Primary Wing Flights
Buttercup
yellow but odd dark feathers are not faults.
Primary Tail Feathers
Clear
buttercup yellow, dark blue or a mixture of both.
Cere
Blue,
fleshy-pink or a mixture of both in cocks, brown in hens.
Feet and Legs
Blue/grey
mottled, fleshy-pink or a mixture of both.
Eyes
Black with a
white iris.
Original text Copyright © 1997,Hector Segui and Norman Schofield
The Albino
Tom Ormerod
 The
characteristic which causes a budgerigar to appear as an albino is also that
which produces the lutino, the difference being that the lutino is the Ino form
of the green series bird whilst the albino is that of the blue series. It is a
sex-linked characteristic and reproduces in the same manner as that for the
opaline, cinnamon, lacewing and slate. The
characteristic which causes a budgerigar to appear as an albino is also that
which produces the lutino, the difference being that the lutino is the Ino form
of the green series bird whilst the albino is that of the blue series. It is a
sex-linked characteristic and reproduces in the same manner as that for the
opaline, cinnamon, lacewing and slate.
Only one bird which carries the Ino
factor is needed to start a family, but the fancier who wishes to introduce
albinos into the stud by bringing in only a couple of birds, would be advised to
use two albino cocks (preferably brothers or very closely-related birds) rather
than a cock and hen pair. The two cocks can then be paired to grey hens, either
normal or opaline and this means that all of the young hens produced will be
visual albinos whilst all the young cocks will be carriers of the ino factor
(called splits).
A young hen bred from each albino cock
can then be paired to the other albino cock the following year, giving two pairs
to produce all albino youngsters. Also, using a split cock from one pairing to
another albino hen from the other can give a further two pairs which can produce
both albino cocks and hens. If the original two cocks were brothers then this is
now giving uncle to niece matings and also those of first cousins -two good
relationship pairings.
The family of albinos should be
reasonably well established after the second year, if only in terms of numbers
and their relationship to each other. Provided that the original birds were of
good colour then this should have been maintained; but from now on great care
should be taken about the amount of grey (visual) birds which are introduced
into the family. Overuse of grey will lead to a dirty, flat, white body-colour
which may have a grey suffusion and which can show wing and other markings.
These markings will appear greyish brown and can sometimes be mistaken for those
of a lacewing, although the long tail feathers of the lacewing, even faintly
marked ones, will always show a brownish quill whereas the mis-coloured albino
will not.
As the colour of the albino is of prime
consideration, this should always be the main factor when any pairings are made.
Any bird to be used (whether albino or normal) if bred from a grey parent,
should be paired to an albino bred from a pair of visual albinos. This does help
to maintain a good body colour. The introduction of flecked-headed non-albinos
into the family should also be done sparingly and with great care, as this can
also show itself -albeit very faintly -even though wing markings may not be
present.
Birds which have a blue suffusion to
tend to be penalised by most judges far more severely than those showing a grey
overlay. They do however, have a place in the breeding programme. The majority
of blue-suffused birds tend to have little or no wing marking and so can be
useful in reducing the amount of visible grey factor. Whilst I have mentioned
the grey as the outcross for the albino, by far the best to use is the dilute
grey which is known as the white grey. This dilute factor is also one which
reduces the amount of melanin pigment visually present in a bird, thereby
lessening the degree of suffusion and/or wing marking. Anyone wishing to form a
family of albinos could do well to also establish a small family line of
slightly related dilute greys of good quality for use as outcrosses.
|
Table of Pairings and Expectations |
|
Pairings |
Expectations |
|
albino x albino |
100% albino |
|
albino cock x normal hen |
normal/albino cocks
albino hens |
|
normal/albino cock x albino hen |
albino cocks
normal/albino cocks
albino hens
normal hens |
|
normal cock x albino hen |
normal/albino cocks
normal hens |
|
normal/albino cock x normal hen |
normal cocks
normal/albino cocks
albino hens
normal hens |
N.B: The cocks from the last-mentioned
pairing can only be proved to be split for the albino factor by test mating to
albino hens.
Original text Copyright © 1996, Tom
Ormerod.
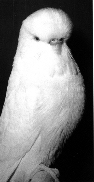
The Dominant Pieds
Tom Ormerod
One of the most popular types of
Budgerigar among the so-called specialist varieties is the Dominant Pied. Why
then have I deliberately titled this article in the plural. You may be forgiven
for believing there is only one type of Dominant Pied. Everything within the
Budgerigar hobby seems designed to foster this impression. The BS Colour
Standard 1994 gives one interpretation only, of the variety.
The Dominant Pied has been popular ever
since the introduction of the Australian "banded" Pied into the UK in 1958. It
is not necessary to have many of this variety of bird within a stud as, due to
the nature of its inheritance, no split birds can be produced from any mating,
so closer control can be kept on the numbers of Pieds produced. The Pied parent
can be either the cock or the hen and, theoretically, half of the youngsters
produced will be Pied. Therefore a Dominant Pied could be a useful addition to a
stud of, say, normals without introducing any hidden factors. They are either
Pieds or do not carry the factor. Dominant Pieds are regularly in the line-up at
major shows sometimes taking leading awards including Best in Show. The normals
which are bred from the same pairings are of the same standard as the Pieds - or
can be - and apart from the touch of colour, extra interest is brought into the
breeding season waiting to see how the Pieds develop as regards their markings.
Original
Pieds were Dutch
Prior to 1958 the Dominant Pied in the
UK was the Dutch, but it always seemed to be difficult to actually improve the
Pieds produced, especially in size, although for some unknown reason this did
not apply to the same degree with the non-Pieds. When the Australian "banded"
Pied arrived it was quickly realized that this factor was capable of being
improved by selective breeding. Not surprisingly, this advantage led to
increased Australian Pieds, to the detriment of the earlier Dutch form. So much
so, that the numbers of Dutch Pieds declined to the point that it is doubtful if
any true examples exist in the UK today.
One additional form of Pied that was
around at the time was the Continental Clearflight. More of the Clearflight
later, as this type still exists. The Dutch Pied had the head spot or patch and,
immediateiy below the mask, had a small clear area of yellow or white similar to
Recessive Pieds. The rest of the body had variegated patches of clear colour on
a normal body ground colour. The wings were approximately 50% dark, 50% ground
colour (white or yellow). The dark markings were usually polka-dotted or
grizzled. Flight feathers were a mixture of clear and dark, and the long tail
feathers could be the same. An attractive and colourful Budgerigar, it is a pity
if the Dutch Pied truly has gone.
Australian "Banded" Pied
The original "banded" Pieds which were
introduced and bred from had, as the name implies, a band of clear colour across
the body. This was roughly a half to three-quarters of an inch wide in the upper
stomach region. These bands were never really always level and straight-Iined,
and after a few years' breeding them, the band factor was found not to be
true-breeding. The first Pied I obtained in 1961 had only a band on the
right-hand side of its body. Bands could be broken or narrower or wider at
various points of the body. Birds with virtually no clear area on the body could
produce youngsters with almost perfect band and the reverse was also true.
Pieds did have, and I believe should
still have, normal body colour above and below the clear area. With the
increasing popularity of the variety some fanciers began pairing Pied to Pied.
This increased the number of Pieds bred, but was also found to increase the
clear area on both the body and wings. The original wings had all clear flights
and secondaries with a narrow, clear leading edge from the secondaries to the
wing butt. Most of today's Pieds tend to have more clear area on the wings
although I, personally, have not seen variegated patches of clear colour as
described in the present Budgerigar Society standard. Odd dark flight feathers
or one or both long tail feathers being dark was, as now, permissible but should
be penalised.
Missing
Spots
One unfortunate aspect which occurred
at the same time as the increase in the clear body
area was that "blanking out" started to encroach on the mask area. This had the
effect of visibly removing one or more spots. Whilst the full complement of
spots should be present some judges do tend to penalise a missing spot, much
more than others, as if it was something which does not occur naturally. The
Pieds with missing spots can, and do, breed young with a full set of spots. The
only birds that I have found not to do so are those with silver feathers in the
cheek patch area. There is always an exception and no doubt someone will let me
know!
The
Clearflight
This bird had all the flights, both tail
feathers, and the head spot or patch all white or yellow. There were no clear
areas on the body or wings. On occasion there could be a slight "bleeding" of
the mask colour just into the extreme upper breast giving a blurred effect. Dark
flights or tail feathers are definite faults to be penalised. How then does one
tell the difference between a badly-marked Clearflight and a Dominant Pied?
Possibly the main way is by the colour of the cere. In the Clearflight the
cock's cere is the blue of a normal, non-Pied, bird. The Dominant Pied cere will
be a bluish- and/or a fleshy-pink. Not a hard and fast guide and certainly no
guide to identifying any doubtful hens! The only differences between the
Continental and Australian Clearflights was the lack of a head spot on the
former, which also had long dark tail feathers though sometimes these could
Why Only
One Dominant Pied Standard?
The present BS standard for the Dominant
Pied is one which, in my opinion, contains aspects of more of than one variety
of the Dominant Pied. It tries to cover all the possibilities which could
conceivably confront a judge. When the Colour Standards committee was revising
all the standards, the Variegated Budgerigar Club submitted proposed standards
for all the Pied varieties: the Australian Banded, the Australian Dominant, the
Dutch Dominant, Australian Clearflight and Continental Clearflight, as well as
the Recessive (Danish) Pied and the Dark Eyed Clear. Surely if there can be
three standards for the Crested Budgerigar, there is merit in acknowledging that
more than one Dominant Pied exists. The Australian National Budgerigar Council
does differentiate between the banded and variegated Dominant Pieds. They stress
that within the banded form there should be unbroken normal body-colour above
and below the clear areas. One other point made by the VBC regarding the
Dominant Pied colour standard was that five points be deducted from mask and
spot and added to those for wing markings, to emphasise the importance of
correct wing markings. The present scale of points establishes no difference
between Normal varieties and Pieds with regard
The Lutino
Ian Fordham
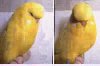 If
you visit most of the Championship shows in the UK you will notice that some of
the largest entries are in the classes for Lutinos. This ensures that any
newcomer to the variety will have plenty of competition if he or she chooses to
exhibit. If
you visit most of the Championship shows in the UK you will notice that some of
the largest entries are in the classes for Lutinos. This ensures that any
newcomer to the variety will have plenty of competition if he or she chooses to
exhibit.
According to the Budgerigar Society
Colour Standard:
- The mask, general bodycolour,
frontal, crown and wings should be a rich buttercup yellow throughout, and all
areas to be clear and free from all markings.
- Primary wing flights and primary tail
feathers - to be yellowish white.
- Cheek patches - silvery white
- Cere a fleshy pink in cocks and brown
in hens.
- Feet and legs to be fleshy pink.
- Eye to be red with white iris.
Judges are instructed to penalise the
following faults:
- Pale violet colour in cheek patches
- Cinnamon brown spots or markings on
back, wings or tail.
- Green suffusion throughout
|
BS Standardised Scale of Points |
|
Variety |
Size, Shape, Balance and Deportment |
Size and Shape of Head including Mask and Spots¹ |
Colour |
Wing Markings |
|
Lutino |
35 |
25 |
40 |
-- |
¹N.B. No
spots should be visible on lutinos.
The usual attraction to the Lutino is
the deep buttercup yellow colour but, believe me, this is very difficult to
achieve when combined with the physical attributes required in todays'
exhibition budgerigar.
My definition of a Lutino is that it is
the Albino form of any Green Series budgerigar. One can therefore, have a Lutino
Light Green, Dark Green or Olive Green; Light, Medium or Dark Grey Green; Light
Yellow, Dark Yellow, Olive Yellow.
The appearance of the Lutino will be
yellow (devoid of all the grey of grey green body colour, black wing markings
etc.) The depth of yellow will depend on the shade of colour the bird is masking
i.e., a Lutino masking Light Green will not have such a deep colour as one
masking Dark Green. It should also be noted that a Lutino masking Grey Green
will not have such a bright colour as a bird masking a colour which does not
have a Grey factor. Like all Albino creatures the bird will have red eyes.
>From the above, one can see that to
produce birds with the desired bright buttercup yellow, we should be aiming to
produce birds masking colours that carry at least one Dark factor i.e., Dark
Green or Dark Yellow. Two Dark factors would be even better i.e., Olive Green or
Olive Yellow.
I would suggest that in all Lutino
pairings, at least one partner should be of good colour and I would not use a
pale Lutino if I had a better good coloured bird. If one pairs two pale coloured
birds together then pale youngsters will be the result.
It should also be noted that today's
Lutinos are a sex -linked variety so one would obtain the following results when
paired to Normals:
|
Breeding Expections |
|
Pairings |
Expectations |
|
Lutino cock × Lutino hen |
Lutino cocks
Lutino hens |
|
Lutino cock × Normal hen |
Normal/split Lutino cocks
Lutino hens |
|
Normal/split Lutino cock × Lutino
hen |
Lutino cocks
Normal/split Lutino cocks
Lutino hens
Normal hens |
|
Normal/split Lutino cock × Normal
hen |
Normal/split Lutino cocks
Normal cocks
Lutino hens
Normal hens |
|
Normal cock × Lutino hen |
Normal/split Lutino cocks
Normal hens |
|
Normal cock × Normal hen |
Normal cocks
Normal hens |
N.B: In
this chart the word "Normal"
means non-Lutino.
If you have read the above and still
wish to continue, I would suggest the Beginner starts off by visiting a number
of larger shows and spends a time studying the birds in the Lutino classes,
trying to fix in his mind the type bird that is winning. Also, make a note of
the breeders who are winning or always seem to have a number of birds near the
top of the classes, particularly with breeder birds. Note who is winning the
best of colour awards.
Having done this, maybe visit one or two
of the exhibitors who seem to have the type of bird you are looking for and then
try to buy one or two pairs from either or both breeders. I feel, if funds
allow, that it is better to buy more than one pair from each breeder as it will
give more chance of success when it comes to breeding with them. If both pairs
breed it will offer some pairing options the following season. I am a great
believer in breeding families of birds together, using related birds in most of
my pairings i.e., half-brother × half-sister, cousin × cousin, nephew × aunt
etc.
If possible, try to buy the best birds
you can with the money available, but bear in mind that it is unlikely that you
will be able to purchase the complete bird. Buy therefore, birds that complement
each other e.g., don't buy all good-coloured but small birds. Make sure you have
a good balance between size and colour but pay particular attention to head
quality, depth of mask etc.
In the early days I would use all Lutino ×
Lutino pairings as this produces less waste and I would continue to do that
until I was unable to purchase Lutino outcrosses of the quality I required.
Having had a successful first breeding
season (we hope!) I would then assess the youngsters produced, bearing in mind
that Lutinos can be very slow developers. I would then select the best pairings
for the next year but still keep the families together. If I felt a particular
feature was missing across most of the offspring the I would go back to the
original source to purchase another bird from the same family - but it would
have to excel in the missing feature.
By continuing to follow these principles
one should, after a few years, have developed a stud of birds displaying family
likenesses which will give you a good basis for the future.
Original text Copyright © 1997, Ian
Fordham.

| 
